Added and diffused around the world!
White Rabbit CAD
Philosophy, Politics, Humor, what ever should have its own place far, far away from galleries and feedback... here we can go for it almost shamelessly! ![]()
Forum rules
More than anywhere on this forum I'd ask you all to be courteous and respectful to each other, but don't hesitate to speak your mind!
Please, do not advertise commercial software here!
More than anywhere on this forum I'd ask you all to be courteous and respectful to each other, but don't hesitate to speak your mind!
Please, do not advertise commercial software here!
Re: White Rabbit CAD
Last edited by Pilou on Fri Apr 24, 2020 1:57 pm, edited 1 time in total.
Is beautiful that please without concept!
http://moiscript.weebly.com/ https://schmoll8.wixsite.com/magicavox
Latop: Geforce GTX 950M, Intel Quad Core i7, Windows 10, 8 Gigas, 2.4ghz
http://moiscript.weebly.com/ https://schmoll8.wixsite.com/magicavox
Latop: Geforce GTX 950M, Intel Quad Core i7, Windows 10, 8 Gigas, 2.4ghz
Re: White Rabbit CAD
I progress 
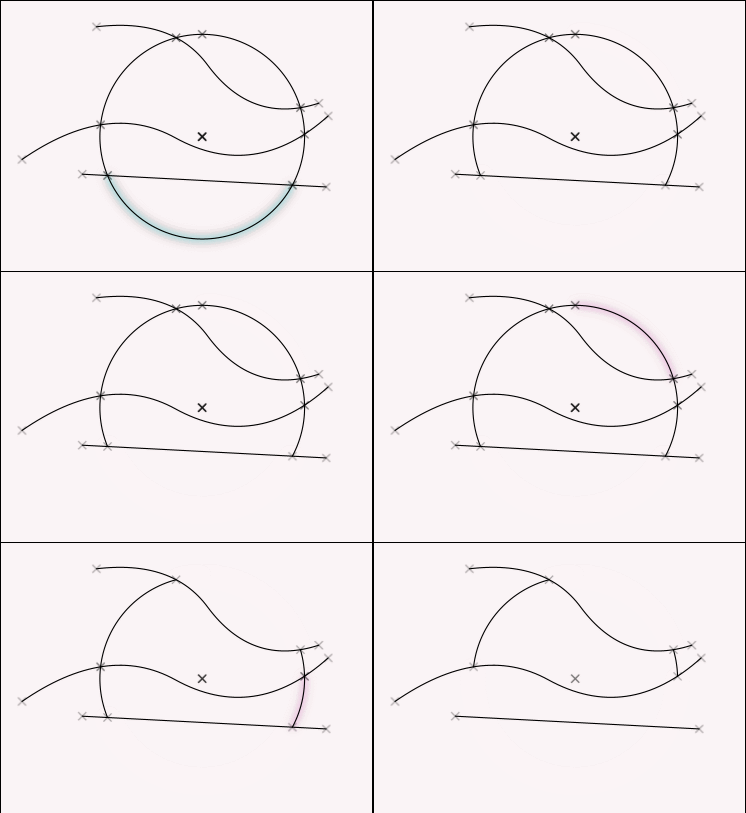
In fact Circle can be Trimed by any curve(s)!
Just SubDivide "Auto" the circle and all is perfect for trim anything you want!
Does exist something for recall "Last Function" ?
Suggestion
Does it possible to have Text beside Function's Button clickable too ?
At any time i want to click on it and must move to the button!

Is beautiful that please without concept!
http://moiscript.weebly.com/ https://schmoll8.wixsite.com/magicavox
Latop: Geforce GTX 950M, Intel Quad Core i7, Windows 10, 8 Gigas, 2.4ghz
http://moiscript.weebly.com/ https://schmoll8.wixsite.com/magicavox
Latop: Geforce GTX 950M, Intel Quad Core i7, Windows 10, 8 Gigas, 2.4ghz
Re: White Rabbit CAD
OH, that is interesting! How funny! I had that discussion with Oli earlier on the Units, where I insisted one should be able to click on the unit itself ( cm, mm, inches...), rather than on the button that says "unit", hehe.
But, yeah, I like it, why not!
We really did our best to leave everything in White Rabbit as open as possible so people can figure out their own ways of doing things. Many ways can lead to the desired results. The functions are there.
Auto Subdivide was one of the most fun things to put in!
But, yeah, I like it, why not!
We really did our best to leave everything in White Rabbit as open as possible so people can figure out their own ways of doing things. Many ways can lead to the desired results. The functions are there.
Auto Subdivide was one of the most fun things to put in!
Re: White Rabbit CAD
Something selected in Draw Mode
No possibility to make CTRL + C, CTRL + V between 2 sessions of White Rabbit ? (seems not but maybe a wizard...
So with my discovery I can now draw anything i want!
And have an illumination this morning!
I believe i can draw all curious things : I will add a section "Tips" to the French site (Trucs)
where all my discoveries of very hard research will be!
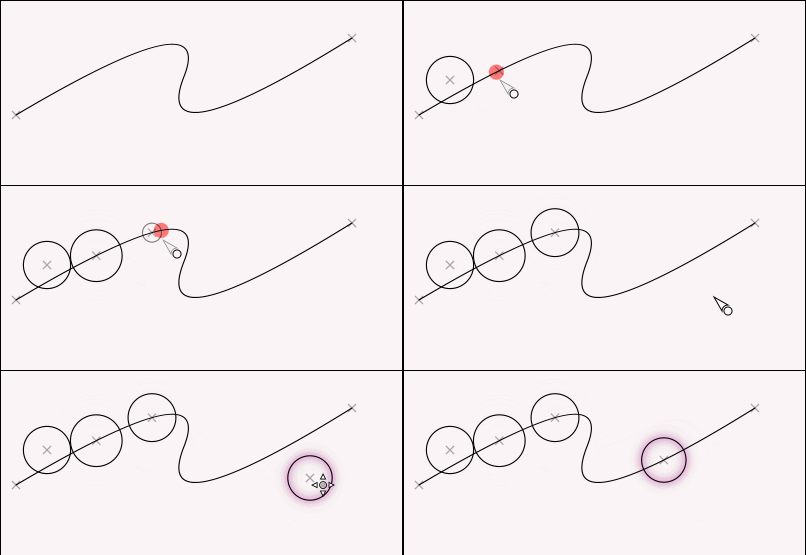
Like this one: very difficult to draw a circle on a Bezier curve directly anywhere you want!
Better to draw your circle somewhere on the space then move it to the Bezier curve with "red" Snap Right Move Click !

Last edited by Pilou on Sat Apr 25, 2020 10:35 am, edited 1 time in total.
Is beautiful that please without concept!
http://moiscript.weebly.com/ https://schmoll8.wixsite.com/magicavox
Latop: Geforce GTX 950M, Intel Quad Core i7, Windows 10, 8 Gigas, 2.4ghz
http://moiscript.weebly.com/ https://schmoll8.wixsite.com/magicavox
Latop: Geforce GTX 950M, Intel Quad Core i7, Windows 10, 8 Gigas, 2.4ghz
Re: White Rabbit CAD
HAHA, that's awesome, Pilou! Olivera sends you ♥ ♥ ♥ and 
Yes, you're right, I haven't used the "clipboard" for copy, but I should try that instead. It's a bit trickier, but not too much. Will do!
Yes, you're right, I haven't used the "clipboard" for copy, but I should try that instead. It's a bit trickier, but not too much. Will do!
Re: White Rabbit CAD
Something like this : only one button! 
Is beautiful that please without concept!
http://moiscript.weebly.com/ https://schmoll8.wixsite.com/magicavox
Latop: Geforce GTX 950M, Intel Quad Core i7, Windows 10, 8 Gigas, 2.4ghz
http://moiscript.weebly.com/ https://schmoll8.wixsite.com/magicavox
Latop: Geforce GTX 950M, Intel Quad Core i7, Windows 10, 8 Gigas, 2.4ghz
Re: White Rabbit CAD
Oh, those buttons will later be "collapsed", if so desired, dropping their labels. They are intended to be "optional", you know.
You can load an image into the background as reference. In the file menu you can "Open..." Jpeg or PNG images. This then will open a preview window. You can then click at the bottom of the preview window the "Add to Drawing" button. The image then gets dropped onto your canvas.
Now you can "Transform" it. Once you activate "Transform", there is a guidance in the input tab as to how to proceed. I'm pretty excited about this feature, but it takes some getting used to.
The transform procedure has two phases. First you click & drag the image into position. Once you let go it turns into a rotate & scale function, based on the axis you now have to place. If you hold shift, as usual, it can lock direction, making it easy to scale the image without rotation.
However, the main idea behind this is to align images to an exact measurement reference. Most of the time these are scanned or photographed patterns. You should know the length of at least one of the lines on your image. This you can then align to a line you have already in your "drawing".
For that you simply make (or have) one line at the desired length and orientation drawn. Then, when you load your image, you grab the image by start of the known line in the image and drag/snap it to the start of your line in the drawing. Then, when you let go, you see that you now have an axis active that follows your mouse. Make this axis end at the end of your reference line in the image and then drag/snap that to the end of the line in your drawing. Voila!
It's a procedure that takes seconds and turns your image into a perfect reference to start tracing over.
Re: White Rabbit CAD
Ah damned i was too speed few days ago!  Crossing posts!
The Import PDF is only "Image"!!! I had not tested if i could snap on it!
We must redraw on it!
No vectorial importation ?
edit: seems not from your previous post!
Yes the "Shortcuts" but with alzheimer that is not very practical for anybody! Button + icon are the top !
The Import PDF is only "Image"!!! I had not tested if i could snap on it!
We must redraw on it!
No vectorial importation ?
edit: seems not from your previous post!
Buttons They are intended to be "optional", you know.
Yes the "Shortcuts" but with alzheimer that is not very practical for anybody!
Last edited by Pilou on Sat Apr 25, 2020 2:05 pm, edited 2 times in total.
Is beautiful that please without concept!
http://moiscript.weebly.com/ https://schmoll8.wixsite.com/magicavox
Latop: Geforce GTX 950M, Intel Quad Core i7, Windows 10, 8 Gigas, 2.4ghz
http://moiscript.weebly.com/ https://schmoll8.wixsite.com/magicavox
Latop: Geforce GTX 950M, Intel Quad Core i7, Windows 10, 8 Gigas, 2.4ghz
Who is online
Users browsing this forum: No registered users and 15 guests


