INFO (manual)
DOWNLOAD PAGE
Minimum System Requirements: Windows PC, that's the only thing I'm sure about, but OpenGL 2.1 should be supported as the whole thing is GL shader based. Plenty of graphics memory is helpful, too. I'd imagine Intel onboard gfx cards on laptops might not work. I recommend Nvidia or Ati no older than 4 years, as dumb as I might sound saying that. Let me know, if you have any troubles, please!
It's recommendable to install Drivers | Wacom, even if you only use a mouse.
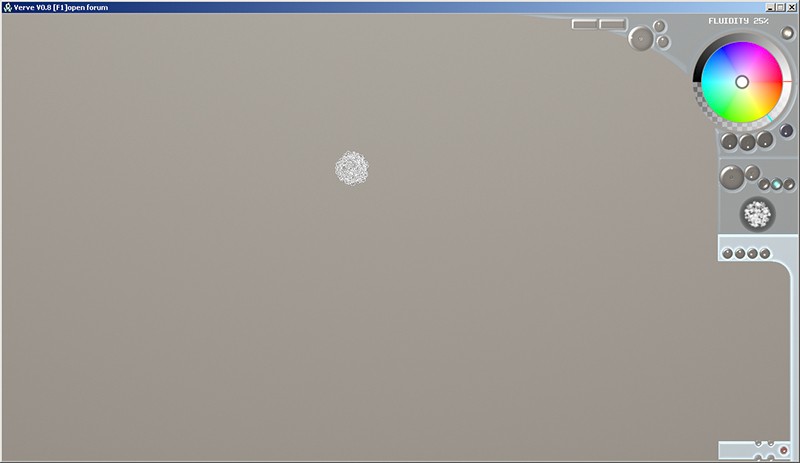
It should start up looking like this (just bigger and probably more features. This was v0.99v.13):
If the color picker or any of the interface does not show, we're in trouble.
Ati may have a bit of a different look (sloppy mess)...
FINALLY with Version 0.8 there is an interface, while some functions are still hidden and only reachable through HotKeys.
What is Verve?
Verve (Dictionary: Energy and enthusiasm in the expression of ideas, especially in artistic performance or composition...) is the result of a curious idea I had to try using the graphics hardware to run a fluid dynamics simulation. Despite some little flaws, as you may observe at faster motions, it works astonishingly well across rather large resolutions. This permits highly detailed simulations of all kinds of liquids, and it screamed to be used for painting. This is an early version, but it already provides a way of painting unlike anything I've ever come across. I hope you enjoy it, too, and stay tuned for what's to come...
Can you use it to create content for commercial projects?
Absolutely! I would love to see what you're using it for, but there's no restriction in that regard. Naturally you must not integrate the software itself, but any content you create with it is totally yours and free from any obligation towards me.
How it works
Ideally you are using a tablet, of course, but even with a mouse it works quite well. Presently there's no real interface aside from the most relevant info in text and a color pallet. Thus be prepared to keep your hands on the keyboard!
The Interface
I wanted to make the interface as little distracting as possible so I opted against a clutter of icons and labels. Instead each major portion of the interface has one location that displays the currently important information. It's probably quite unusual and I don't know how well it will be received, but I- obviously- like it.
Dials drag up or right to increase and left or down to decrease the values! Hold [Ctrl] while dragging to fine-tune the values!
Toggles I shouldn't have to explain!
Layers have only one less obvious feature and that is Delete. Select the layer you want to hide or show, hold and drag right to bring up the Delete Layer requester.
The layer panel itself may come across a bit funny, because the dials you find at the top of the layer panel are always only for the currently selected layer!
Ok, there are two less obvious features now since v0.98:
- merge layers Hold down [Ctrl] to change the "add above/below" button on the layerslide to "merge above/below".
- copy layers Hold down [Shift] to change the "add above/below" button on the layerslide to "copy above/below".
The fluid parameters
Fluidity - strength of fluid dynamics. They are always active, even at zero.
Fluid Sharpness - reduction of blur of the vector field. At 100% the vector momentum is not spread at all, making the fluid motion as sharp as possible.
Fluid Smudge - blending of colors along the fluid motion. At 100% the existing color dominates the moving color, making some very nice smudging possible. At 0% you can almost just deform your image.
Drying - dries the fluids so that only where you paint it gets wet, which rapidly dries up again. Hotkey to toggle is [d]
Drying Speed - controls the speed at which the paint dries...yep. But I might still adjust full tilt on drying speed as it currently makes little sense!
Smudge Chroma - controls the color blending behavior of smudging (not average or opacity blending). 10% is default and ideal (IMHO), but you may turn it off or go crazy at 100%. This magical routine tries to preserve the color saturation as it blends from one color into another in a very special way. I'm almost certain you've never seen anything quite like it!
The brush parameters
Brush size, minimum size for pressure sensitivity and the toggle buttons are the obvious ones. But there's more...
Blending - turns on and controls the amount of "color averaging" under your brush. This works beautifully together with smudging, as it blends into the stroke the existing colors on the canvas. I like having about 30% of it up, but it does slow down the machine a little bit.
Build-up - controls the amount of material that gets transferred to the canvas as you paint. Similar to but independent from the opacity for color, this shows the mechanics of Verve, as paint medium (like the oil in oil paint, so to say) is independent from color (like color pigment density in the oil). Bonus side effect: If you turn this parameter down to 0%, it only colors existing material on the canvas, making the existing material effectively acting like a positive mask.
BRI.SIZE - stands for Bristle Size and refers to the size of each individual bristle in brushes that have bristles. As I'm adding more complex brushes, I'm trying to keep those parameter sensible to the features of such new brushes, like Brush #8 (fractal turbulence brush). Here the bristle size controls the coverage amount of encountered opaque values in the fractal noise. Currently this value scales with the size of the brush.
BRISTLES - stands for Bristle Count, controlling the amount of bristles in a bristled brush. Here, too, the implementation for complex brushes such as brush #8 tries to stay consistent in logic and thereby scales the fractal noise so that more opaque splotches will be painted within the brush size. Currently this value scales with the size of the brush.
BIAS - is a "hidden" dial on the brush thumbnail. Drag it to adjust which bristles will be used of the brush. Most brushes respond to pen tilt, but many of you may not have that feature on your tablet. I hope you do, though, because it's quite powerful!
The tiny little buttons all the way on the edge are for the brush selection: "Next" and "Previous" brush.
The Hotkeys
[Tab] toggles "interface" visibility
[Shift]+[Tab] toggles brush cursor visibility!
[o] to load projects
[s] to save projects/export images (png, jpg)
[Shift]+[s] to save as...
[Ctrl]+[s] to save active layer only as 16 bit PNG with alpha
[Ctrl]+[Shift]+[s] to save image as two 16 bit PNG images of components: Color only and Material only (height image). Filename gets suffix "_col" and "_mat".
[Shift] + [F2] turns on Adjust Canvas Area. Hit [Shift]+[F2] again to confirm the changes! Hit [F2] alone to cancel the changes!
- Grab the corners with [LMB] to adjust the crop area freely and [RMB] to keep proportions!
- Grab the edges to just adjust the chosen edge!
- Hold [Alt] to adjust crop area symmetrical around original canvas center!
- Grab inside the crop area to move the whole crop area!
[Ctrl] + [Delete] starts a new project at current resolution with the option to reset to default settings on everything
[Shift]+[Home] resets the window to the size of the canvas
[Ctrl]+[Home] fits canvas zoom to window size
[F3] toggles "fullscreen" which really is just a desktop sized window without borders, but hey... certainly covers the full screen.
[F4] toggles border conditions for canvas display between "Clamp", "Repeat" and "Mirrored Repeat".
Painting...
Holding the Left Mouse Button (LMB) will let you paint on the canvas.
Hold [Shift] to just move paint around. (fluid smudge parameter dials between smudging and pushing)
Hold [Ctrl] to erase paint, which also moves the paint.
Hold [Ctrl]+[Shift] to flatten the material gradually.
[w] toggles pen pressure on brush size
[e] toggles pen pressure on brush opacity
[r] toggles brush blur/sharpen, blurring or sharpening everything beneath your brush as you make your strokes.
[Alt] + [LMB] to pick a color from the paint on your layer
[Alt] + [RMB] to pick a color from the image
Widgets...
(hold down keys to display and adjust):
[Space] + [LMB] to adjust brush size
[brackets] to adjust brush size like in Photoshop. Except this one doubles or halves the brush size with each respective key hit.
[Space]+[LMB]+[Shift] or [Ctrl]+[RMB]+[Shift] to adjust minimum brush size when using tablet pressure [w] toggle
[Space]+[Ctrl] to adjust color picker size
[c] toggles the display of a local colorwheel on the canvas at the cursor position. You can grab and move it by the left upper edge outside the wheel (still have to add gfx for that).
[Shift]+[c] brings up color swatches.
...to edit the swatches:
- hold [Ctrl] and click on the existing swatch to save the current color into it.
- hold [Ctrl] and hover next to an existing swatch, where a miniature swatch appears. Click with LMB on it to make a new swatch with the current color.
- hold [Ctrl] and use RMB to remove an existing swatch.
- the same concept works on the small buttons above the swatches, which are like folders for additional swatch stacks. LMB to add, RMB to remove.
[f] brings up fluidity dial to mouse cursor
[Shift]+[f] brings up fluidity smudge
[Ctrl]+[f] brings up fluidity sharpness
(b) brings up material build-up parameter
[Shift] +(b) toggles between two build-up values, both of which you can adjust
[Ctrl]+[z] undo/redo (only 1 undo per layer at the moment)
Controlling fluids...
[d] toggles drying on/off
[cursor left/right] adjust fluidity. You can adjust that while you are painting, which can be good fun!
[-] [=] adjust fluid sharpness.
[_] [+] adjust fluid smudge.
Controlling bumpiness...
[cursor up/down] adjusts the bump height of the paint. This is per layer and will come in handy, once you get to know it!
[Ctrl] + [cursor up/down] adjusts glossiness
[Ctrl] + [cursor left/right] adjusts diffusion
[Ctrl] + [PageUp/PageDown] adjusts metallic
You can do an over all adjustment of all layers, relative to their settings by using [Ctrl]+[Shift] on the above three parameters.
Controlling light...
[Shift] + [cursor keys] move the light source along x and y
[Shift] + [page up/down] moves the light source along z (in and out of the image)
[L] will set the light color to the currently selected color
[Shift] + [L] will set the ambient light color to the currently selected color
Brushes...
[1]...[8] are the 8 different experimental brushes currently available. Brush [4] reacts to the tablet's pen rotation.
[w] toggles pressure sensitive brush size
[e] toggles pressure sensitive brush opacity
[r] toggles brush blur
[q] toggles mask painting. The mask currently just acts as a border condition for the fluids. You can still paint over the area.
[Shift] + [q] sets current layer's alpha channel as mask for fluids.
[Ctrl] + [w] toggles "image warp" mode. In this mode your brush warps image coordinates only. Undo only works outside of warp mode, switching between the image before and after the warp. Currently there's no undo within the warp mode, but that won't destroy your image!
- Hold [Ctrl] during painting in warp mode to restore original image coordinates inside the brush radius!
[Ctrl]+[Shift]+[w] will reapply the last used warp. This way you can apply the same warp to other layers or have some fun reapplying the same warp a few times, hehe.
Controlling the background/canvas...
[p] will set the background color to the currently selected color
[h] toggles High Quality mode on/off for super-sampling of the lighting
[Shift]+[d] toggles dithering on/off
[Ctrl]+[d] makes whole canvas wet, if drying is turned on.
Controlling the image...
[delete] will clear the image! ( In mask mode it will clear the mask, in warp mode it will clear the warp! )
[F5] toggle mirror modes (none, left half to right, right half to left)
[Shift]+[F5] commits mirror mode, burning it to the image. This way you can design symmetrical but then continue normally.
[F6] flip image horizontally (doesn't actually flip the image, but you can continue to paint on it)
[F7] flip image vertically (...as above)
[Alt]+[Shift]+[LMB] to pan the image
[Alt]+[Ctrl]+[LMB] to zoom in and out
[Alt]+[Shift]+[Ctrl]+[LMB] rotate the canvas
[Alt]+[Shift]+[Ctrl]+[RMB] reset rotatation of the canvas and stops "spinning", if active.
[-] and [=] control canvas spinning speed.
[numpad +] to zoom in (2x increments)
[numpad -] to zoom out (...)
[Home] to reset zoom, pan, rotation and stops spinning
[Alt]+[Shift]+[RMB] or [Alt]+[Ctrl]+[RMB] also resets zoom and pan
Layers...
[F9] adds a new layer
[F10] goes to previous layer
[F11] goes to next layer
[F12] toggles hide on current layer
[Shift] + [F10] moves the current layer under the previous layer
[Shift] + [F11] moves the current layer above the next layer
[Shift] + [F9] experimental merge of the currently layer onto the previous layer
[Shift] + [delete] to delete current layer
[Shift] + [Ctrl] + [f] to fill the current layer with the currently selected color at currently selected opactiy.
[Shift] + [v] to enter transform mode (currently only move) ...to toggle it off you may only hit [v]
Grid...
[g] toggles visibility of the grid
Editing the grid:
[Ctrl]+[g] toggles editing of the grid
[LMB] dragging controls opactiy (can go positive and negative)
[Alt] + [LMB] free rotation
[Alt] + [RMB] horizontal rotation
[Alt] + [Shift] + [LMB] drag horizontal and vertical position of the grid along current rotation axis
[Alt] + [Ctrl] + [LMB] drag horizontal and depth position along current rotation axis
[Shift] + [LMB] drag horizontal and vertical camera axis
[Ctrl] + [LMB] drag horizontal and depth camera axis
Mousewheel controls amount of subdivisions of the grid box
[Shift] + Mousewheel controls lens distortion
[Ctrl] + Mousewheel controls field of view
-------------------------------------------------------------------------------------------------------------------------------------------------
TEMPORARY INFO FOR VERVE v0.99v.1
This is a laboratory version, full of strange little experiments and interface stuff all over the place, but...heck...it's Christmas and there are plenty of gifts in it!
I will not update the INFO just, yet, but I'll write a tiny documentation here for the most important stuff...
PAINT MODES
There are now three paint modes with which you can paint:
(=) Absolute: In this mode your paint will not accumulate on the canvas, but only rise up to the chosen build-up amount. It's ideal for sketching.
(>) Accumulative: This is the original paint mode, accumulating material on the canvas like it always did. It's ideal for painting.
(+) Additive: This modes adds color values to existing color like adding light, in a way, eventually creating a glow. There is also a new parameter on top for an interactive glowing effect. It's fun. It's good for...ehm... fun. And all things light!
BRUSH IMAGES (image brush)
Currently brush images are just experimental and work with brush #9 and #0.
Brush images are like animation frames. You can keep adding images and they will playback as you paint. There is no management for them, yet, but you can save and load your brush image sequences already!
Please, be patient and careful when you operate the hotkeys, not because there's any problem with it, but because it's a little weird. There are no indicators for modes or any stuff that one should expect, yet, so it's all very, very "garage" or "laboratory"...but still enjoyable, hehe, you may see!?
- [i] to add new brush image and toggle on brush image edit. It opens a little rectangular selector. More on that one further down!
- [Ctrl]+[Shift]+[i] toggles color mode, either using the original colors of the images, tinted by current color, or only use current color, ignoring image colors.
- [Shift]+[i] deletes only the previous image. [don't ask, I wasn't done, yet!]

- [Ctrl]+[i] paste currently active brush image. [all just remains of my tests]

- [j] toggles perspective transformation on/off, approximating the perspective of the image taken as suggested by your selector rectangle.
- [Shift]+[i] to delete all images. [all still temporary]

- [Ctrl]+[i] toggles paint modes. When ON it will use the color and material of the image. When OFF it will flatten the material. Using Average when OFF works like standard Average blending. When ON Average samples the color in the center of the brush and paints the complete image tinted by that color!
brushes that use images:
- Brush #9 with images... well, you'll see, it will just paint with the image spread across the bristles. (Crazy fun, if you know what you're doing!)
- Brush #0 only works with images. If there is no image, it will not draw anything!!! The little brush interface dials will do very specific things to this brush. Go explore, hehe! I'll explain more later, I promise!
MASK MODE
Mask mode now actually masks the image.
- [q] toggles mask active status without changing the mask.
- [shift]+[q] picks up the current layer's paint as mask.
- [ctrl]+[q] toggles the mask mode on/off
- [ctrl]+[shift]+[q] inverts the mask
...more an Brush Images:
Again, when you press [i] you automatically add an image, bringing up the image selector Quad. The editing of it was not finished, but you can drag the corners separately or grab it by the edges to adjust an entire edge or grab it by the center to move the whole Quad. However...
- [right click] ON THE CENTER to turn your Quad into a square. It will figure out the average size based on all edges, you will see!
- [right click] ON THE EDGE (not the corner) will freeze the frame so you can paint over it without worries. This is cool when you want to make an animation or animated brush progression. I have to make a little youtube video for that! [right click] ON THE EDGE again and you will unfreeze the Quad again.
You can make a sequence of images to use as brush image, effectively creating an animation. To control how it plays during painting you have currently two experimental choices by means of a toggle in the "Image Board" GUI piece in the upper left corner:
(>>) will play the animation as you paint. (Brush #0 will advance a frame with each painted image according to "Bristles" parameter)
(pr) will use pen pressure to pick an image from your sequence, starting at the lowest on the left to the highest pressure for the last image.
(rn) will use random images from your sequence.
Brush #9 with images
Try the following...
mini tutorial:
- select white color
- select brush #2 (trust me, you'll understand why I suggest that now!)
- hit [i]
- keep the Selector Quad where it is for now!
- [right click] on an edge of the Quad (not a corner!)
- make a single small dot in the center
- hit [i] again, which will store the image!
- hit [i] again to add a new image!
- make some more dots around the center!
- hit [i] to store and [i] to add a new image again
- make some more dots and make the center of it a bit more dense!
- [i], [i]
- add more and more stuff and keep doing that for a few images more!
When you've had enough, make sure you're done with your images (Selector Quad is no longer visible) and then select Brush #9.
If you have pen pressure, you will see that it animates through the images according to your pen pressure. IT DOES NOT WORK WITH MOUSE! (I'm sorry, it was just a test, you know! Maybe I'll have a look into it for those of you, who only have mouse.)
Brush #0 with images
This brush paints similar to Brush #1, not using bristles, but will use your images instead of a blob. It paints those in intervals as you make a paint stroke. The speed at which that happens is based on the little dial called "Bristles" right next to the preview image on the brush GUI. (Oh man, I just noticed that I might have changed labels without changing them back for the old brushes, haha, danged...laboratory version!!!). Next to it is a smaller dial called "Osc.Chaos". Up to 50% this will randomize the rotation of the images as you paint. However, go over 50% and it will begin to offset the images until some maximum spread (very chaotic!). Above the "Osc.Chaos" dial is the "Oscillator" dial, which will simply rotate the image clockwise above 50% and counter clockwise below 50%. Next to that is the "Bri.Size" dial, which really randomized the image size with each plot. Master these few parameters and you can achieve a pretty interesting variety of effects!


